How to create video calling app in node js?

How to create video calling app in node js?

By Deepak Sharma

Making a video call application or website, Video calling app required that each and every  peer/ client availabilty send their video and audio stream to all the other peer/clients. So fullfile this purpose we are using peer.js and for the communication between the peer/clients and the server we are using WebSocket  (Socket.io). Pre requirments : 1. Node.js: It is an open-source JavaScript Back-End technology. It has a package manager called npm– Node package manager which installs different packages very easily. 2. Express.js: It is a node.js server framework. 3. Socket.io:It helps us to create a real-time bi-direction event-based communication between the server and the client. 4. Peer.js: It helps us to send and receive the audio and video streams of the other clients. First step - we are creating and initializing a new directory / folder. $ mkdir VideoCallApp $ cd VideoCallApp $ npm init Installing the required modules: $ npm install express $ npm install ejs $ npm install socket.io $ npm install nodemon
Continue Reading

What is Onionplay and who should use it?

By kamlesh kumar

If you have no idea what onionplay is, you’re not alone – many people don’t have a clue. However, onionplay is quickly becoming the best option for secure and anonymous communications online, so it’s important to be informed. In this article, we’ll tell you all about onionplay and how it works so that you can decide if it’s right for you or your business. Why onionplay was created In its simplest form, onionplay creates a single interface for multiple communications platforms. Today, businesses need to be active on social media sites such as Twitter, Facebook, LinkedIn and more. With onionplay you have a single interface for managing all of your accounts. No longer will users need to bounce around from one tab or browser window to another. This ensures that interactions can be had across a wide variety of mediums while reducing time spent monitoring multiple sites.  The Internet today presents a dizzying array of communication mediums. There are countless social media sites, news sites, chat systems and more. The options can seem overwhelming, and knowing how to take advantage of them can be tricky. At onionplay we provide an interface for managing all of your accounts in one place – allowing you to easily engage with followers across all major platforms – including Google+, YouTube, Instagram, Pinterest, LinkedIn and Facebook – as well as numerous niche services such as Linkedin Answers, Disqus (commenting), Quora (question/answer) forums; Yahoo! Answers; chat systems such as Skype or Google Chat; IM services such as AIM or YIM; Photo-Sharing services like Flickr or Photobucket... What can onionplay be used for This is where onionplay comes in. The main purpose of onion play, as its name suggests, is to help protect against packet sniffing on unencrypted network traffic. Onions can be used for many types of communications, including email (both plaintext and PGP), instant messaging (XMPP, IRC), voice-over-IP (Mumble/Teamspeak/Ventrilo/Skype) and web browsing. These networks are prime targets for both passive surveillance (through packet sniffing) or active attacks that may lead to identifying users or compromising user security.  Onions can be used on networks that use either end-to-end encryption (such as HTTPS or PGP) or on networks that don’t (such as IRC, Ventrilo, Mumble). While end-to-end encryption protects traffic between your computer and your contact’s computer, onion services prevent eavesdropping
Continue Reading

How to integrate Razorpay Payment Gateway in PHP - Payment Gateway Tutorial

By Deepak Sharma

Hello Friends today I am talking about how we can integrate Razorpay Payment Gateway in PHP Based website, in simply and easy way with video tutorial. Believe me,  most of the time we are facing problem during integration of any type of payment gate way, but it is not much hard as we think. Today I shall tell you to integrate Razorpay Payment Gateway in PHP websites. Steps as follow : First of all we required razorpay merchant account. Login into your marchant account. Now to settings -> API keys -> generate test key, now export keys in excel for future requirement. Now download Razorpay php kit from github url : https://github.com/razorpay/razorpay-php/releases download razorpay-php.zip from 2.5.0 latest release. Now create database and tables to store response from payment gateway (razorpay db name) create it as per your requirement.  Now create table payment_laser and add fields as pay_id, payment_id, order_id, signature_hash, created_at. Now extract download razorpay-php.zip kit into your wamp->www/xamp->htdocs folder and extract all files. Now create database config connection with your website. Now goto project root folder ans create new file called demo.php. and write/past code below :              How to integrate Razorpay Payment Gateway in PHP | Payment Gateway Tutorial                     .booking-div {                 padding: 15px;                 box-shadow: inset 0 0 0 1px #e0e5e9;                 border: 5px solid #fbfbfc;                 -webkit-border-radius: 5px;                 -moz-border-radius: 5px;                 border-radius: 5px;                 margin-bottom: 30px;                 background-color: #fff;                 width:
Continue Reading

Create android mobile sharing option on website using JavaScript

By Deepak Sharma

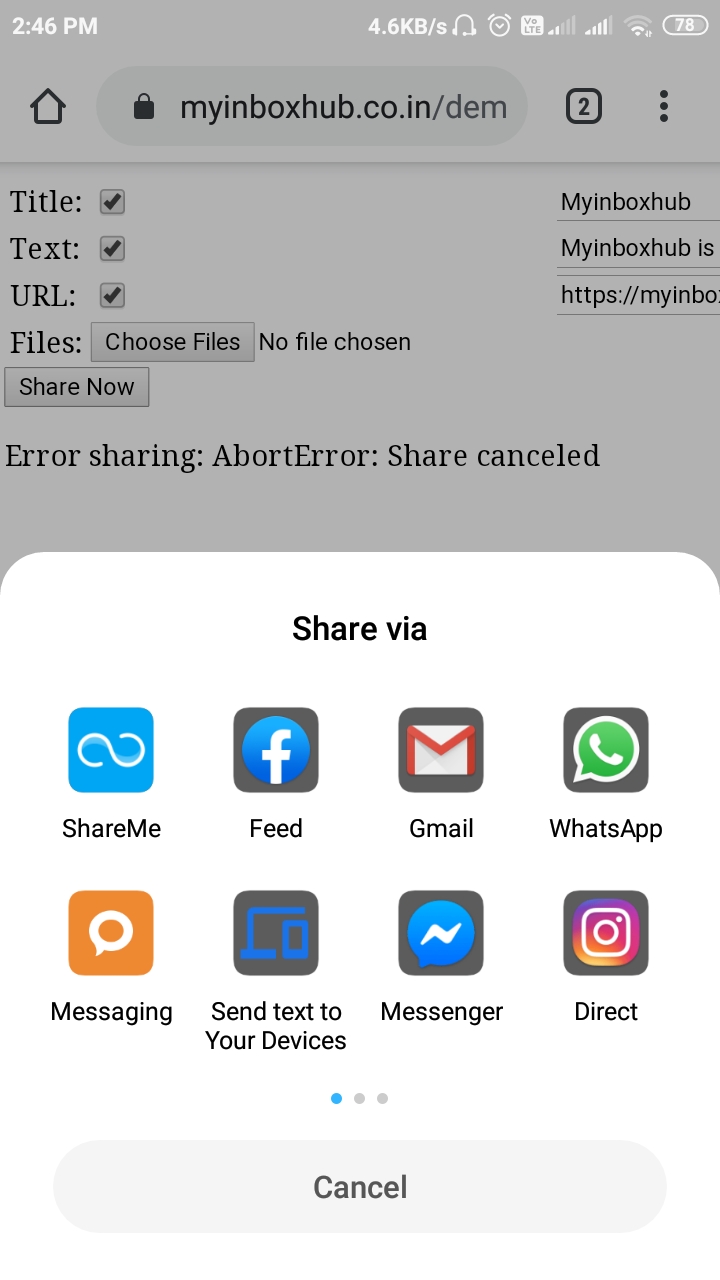
Hi guys in this blog I am try to Create android mobile sharing  option on website using JavaScript; In very simple steps;    You can use it in your various project such as 1) On mobile based websites.  2) Provide flexibility in share data among various android app, using android share feature 3) You can use it in referral sharing system and so on.   Requirement : 1) Html editor 2) Chrome browser 3) Website having SSL or https for eg.(https://myinboxhub.co.in) \ Note*  Not work with http. Steps : 1) Create mobileSharingJavascript.html file; 2) Copy and paste code as below;   <table>     <tr><td>Title:</td>         <td><input type="checkbox" id="title_checkbox" checked /></td>         <td><input id="title" value="Myinboxhub" size="40" /></td>     </tr>     <tr><td>Text:</td>         <td><input type="checkbox" id="text_checkbox" checked/></td>         <td><input id="text" value="Myinboxhub is the largest, most trusted online community where students, teacher, developers & beginners to learn, share? ?their ?knowledge." size="40"/></td>     </tr>     <tr><td>URL:</td>         <td><input type="checkbox" id="url_checkbox" checked/></td>         <td><input id="url" value="https://myinboxhub.co.in" size="40"/></td>     </tr>     <tr><td>Files:</td>          <td><input id="files" type="file" multiple></td>     </tr>   </table> <input id="share" type="button" value="Share Now" />   <div id="output"></div> <script><br/>  'use strict';     function sleep(delay) {
Continue Reading

Create custom google voice search

By Ankur Rajput

Hi guys in this blog I am try to Create android mobile sharing option on website using JavaScript; In very simple steps; You can use it in your various project such as 1) On mobile based websites.  2) Provide flexibility in share data among various android app, using android share feature 3) You can use it in referral sharing system and so on. Requirement : 1) Html editor 2) Chrome browser 3) Website having SSL or https for eg.(https://myinboxhub.co.in) Note* Not work with http Steps : 1) Create mobileSharingJavascript.html file; 2) Copy and paste code as below; Title: Text: URL: Files: 'use strict'; function sleep(delay) { return new Promise(resolve => { setTimeout(resolve, delay); }); } function logText(message, isError) { if (isError) console.error(message); else console.log(message); const p = document.createElement('p'); if (isError) p.setAttribute('class', 'error'); document.querySelector('#output').appendChild(p); p.appendChild(document.createTextNode(message)); } function logError(message) { logText(message, true); } function checkboxChanged(e) { const checkbox = e.target; const textfield = document.querySelector('#' + checkbox.id.split('_')[0]); textfield.disabled = !checkbox.checked; if (!checkbox.checked) textfield.value = ''; } async function testWebShare() { if (navigator.share === undefined) { logError('Error: Unsupported feature: navigator.share()'); return; } const title_input = document.querySelector('#title'); const text_input = document.querySelector('#text'); const url_input = document.querySelector('#url'); const file_input = document.querySelector('#files'); const title = title_input.disabled ? undefined : title_input.value; const text = text_input.disabled ? undefined : text_input.value; const url = url_input.disabled ? undefined : url_input.value; const files = file_input.disabled ? undefined : file_input.files; if (files && files.length > 0) { if (!navigator.canShare || !navigator.canShare({files})) { logError('Error: Unsupported feature: navigator.canShare()'); return; } } try { await navigator.share({files, title, text, url}); logText('Successfully sent share'); } catch (error) { logError('Error sharing: ' + error); } } async function testWebShareDelay() { await sleep(6000); testWebShare(); } function onLoad()
Continue Reading

Create you own calendar in php

By Ankur Rajput

Create Custom calender using PHP Hi guys in generally 90% developers are using predefine calenders in javascript or jquery, that is good and enough for almost all purposes. But some time need to add some additional feature in calendar which is not available freely. Thats by in this tutorial I am trying to create own calendar upto next 12 months which is ajustable.  Lets start 1) We need to create something like this or flexible array which is also use for API's.   2) I am going to use php because I am going to create calendar array which is useful for ploting dates and in API's for front end; 3) Let start coding part; <?php  $CurrentDay = date('d'); /* For current date*/ $CurrDate = strtotime(date('Y-m-d')); /* For current Date  Y-m-d */ /* Now*/  for ($i = 0; $i < 12; $i++) {               $r = 0;             $daysA = []             $months = date('Y-m-d', strtotime('+' . $i . ' month'));             $monthAlpha = date('M Y', strtotime('+' . $i . ' month'));             $DaysInCurrMonths = cal_days_in_month(CAL_GREGORIAN, date('m', strtotime($months)), date('Y', strtotime($months)));             $monthsArr[$months]['month'] = $months;             $monthsArr[$months]['monthAlpha'] = $monthAlpha;             $mon = date('m',strtotime($months));             $yr = date('Y',strtotime($months));             $day = date('D', strtotime(date($yr.'-'.$mon.'-'.'01')));              if($day == 'Fri'){                 $skipVal = 5;             }             elseif($day == 'Sun'){                                     $skipVal = 0;             }            
Continue Reading

How to install angular js

By Deepak Sharma

Angular JS Hello friend, today in this tutorial we talk about Angular JS and hwo to install it on windows. In easy and simply way helpful for learner's. We are going to install Angular JS 8.2, before going to install it, let be know about angular js and why we need it. AngularJS is a JavaScript framework. Angular is an open-source, front-end web application development framework, it is TypeScript-based and led by the Angular Team at Google and by a community of individuals and corporations. In this document, we will cover installation procedure of angular on windows 10 operating system. Prerequisites System requirements Windows 10 OS 4 GB RAM 10 GB free space Installation Procedure  To install angular cli we need nodejs and npm. First let’ us understand what is nodejsare and why we need them. Node.js is an open-source, cross-platform JavaScript run-time environment that executes JavaScript code outside of a browser. Node.js lets developers use JavaScript to develop wide variety of applications like network applications, command line tools, web api, web applications. You need nodejs for dev tooling (like local web server with live reloading features) and dev experience, you do not need nodejs to run react in production. Firstly download nodejs, you can dowload from https://nodejs.org/en/download/?utm_source=myinboxhub.co.in. Click on windows Installer to download the latest version.  Now its a time to test you node js. Open cmd or command prompt and type node -v. As show in image below. Now install angual cli , just type npm install -g @angular/cli , show in image below. It take Some time to install. Now its time to check your angular js install successfully or not. just type ng version in cmd, show as in image below. Now its a time to run your first angular js project. now type ng new first-project here first-project is your project name you can change as per your requirment. After that press Y then enter for routeing. Then
Continue Reading

how to create scramble password using substitution method in php

By Ankur Rajput

create Scramble Password Hi guys this tutorial for how to create Scramble Password using substitution method in php. Limits I am showing encrypt only 10 digit alpha or numeric string. Code(in PHP) $start_time = microtime(true); function ScramblePassword($ps){ $val = ''; $code1 = '1234567890aAbBcCdDeEfFgGhHiIjJkKlLmMnNoOpPqQrRsStTuUvVwWxXyYzZ'; $code2 = 'r^7eYB0wa(Ac$GCnMqI6ZDS@zEt8OpFg%hHWRi5j3VX1J#kbvKxdyl*L9muNo!4P&sTU2fQ)'; //echo $code2; die; for ($i = 0; $i < 10; $i++) { $i = strlen($ps); $ps .= " "; } //die; $val = substr($code2,strpos($code1,substr($ps,1,1),0) + 7,1). substr($code2,strpos($code1,substr($ps,5,1),0) + 10,1). substr($code2,strpos($code1,substr($ps,2,1),0) + 5,1). substr($code2,strpos($code1,substr($ps,3,1),0) + 1,1). substr($code2,strpos($code1,substr($ps,8,1),0) + 8,1). substr($code2,strpos($code1,substr($ps,7,1),0) + 9,1). substr($code2,strpos($code1,substr($ps,0,1),0) + 4,1). substr($code2,strpos($code1,substr($ps,4,1),0) + 3,1). substr($code2,strpos($code1,substr($ps,9,1),0) + 6,1). substr($code2,strpos($code1,substr($ps,6,1),0) + 2,1); return $val; } $end_time = microtime(true); $execution_time = ($end_time - $start_time); echo " Execution time of script = ".$execution_time." Sec"; echo ''; echo ScramblePassword($ps = 'testing'); I hope you like it. Video tutorial is a
Continue Reading

How to Activate Do Not Disturb (DND)

How to Activate Do Not Disturb (DND)

By Deepak Sharma

The Indian Telecom Industry has millions of subscribers, that allow the consumers to communicate with their loved ones by calling or messaging. At the same time, the telemarketing companies make indiscreet calls to consumers to sell their products and flood their inbox with promotional messages, which can be annoying at most times. To tackle this problem, the Telecom Regulatory Authority of India (TRAI) has come up with a unique solution called DO NOT DISTURB (DND) registry. What is DND? To stop receiving unwanted telemarketing calls and messages, you can register with your service provider’s Do No Disturb registry. The service provider will in turn register your number at the National Do Not Call (NDNC) registry within 45 days. The NDNC Registry is a database having the list of all telephone numbers of the subscribers who do not want to receive commercial calls or SMS. Telemarketers have to verify the calling number list in the NDNC registry before making a call. So rest assured, the telemarketers will not trouble you else they will be fined for calling you. How to register your number on the DND registry? If you choose not to receive any commercial messages or calls i.e for fully blocked registration: You can call 1909 (toll free) from your landline or mobile and select your preferences. You can also register by SMS by sending START DND or START 0 to 1909. If you choose to receive SMS on select categories or for partially blocked registration, you can send SMS in this format START<space><preference no> to 1909. There are 7 preference numbers to choose from: START 0- Fully blocked START 1- Banking, Insurance, Financial products and credit cards START 2- Real Estate START 3- Education START 4- Health START 5- Consumer goods and automobiles START 6- Communication, Broadcasting, Entertainment and IT START 7- Tourism and Leisure For instance, type START 4 to 1909, if you want to receive messages only on HEALTH. You can also include more than one preference number like START 4,6 to receive messages for more than one preference.  To Deregister: You can deregister by calling or sending a SMS: STOP DND to 1909. You can only deactivate after 3 months or 90 days from your date of activation. The activation
Continue Reading

How to Integrate PAYTM Payment Gateway in PHP

By Deepak Sharma

How to Integrate PAYTM Payment Gateway in PHP Hello Friends today I am talking about how we can integrate Paytm Payment Gateway in PHP Based website, in simply and easy way with video tutorial. Believe me,  most of the time we are facing problem during integration of any type of payment gate way, but it is not much hard as we think. Today I shall tell you to integrate Paytm payment gateway in PHP websites. These are the follow steps: Step 1: First of all we need a php integration kit of Paytm that will provided by Paytm (https://github.com/Paytm-Payments/Paytm_Web_Sample_Kit_PHP) download from this url. Step 2: Now extract the .zip in to your localhost root folder(www or htdocs). Step 3: Now we found 4 files(pgRedirect.php,pgResponse.php,TxnStatus.php,TxnTest.php) and 1 folder(lib). Step 4: Now click on lib floder, there are 2 files as config_paytm.php and encdec_paytm.php. Step 5: Now open config_paytm.php. This file contents all criedentials of paytm gateways such as define('PAYTM_ENVIRONMENT', 'TEST'); // PROD define('PAYTM_MERCHANT_KEY', 'xxxxxxxxxxxxxxxxxxxxxxxx'); //Change this constant's value with Merchant key downloaded from portal define('PAYTM_MERCHANT_MID', 'xxxxxxxxxxxxxxxxxxxxxxx'); //Change this constant's value with MID (Merchant ID) received from Paytm define('PAYTM_MERCHANT_WEBSITE', 'xxxxxxx'); //Change this constant's value with Website name received from Paytm here PAYTM_ENVIRONMENT are 2 type TEST / PROD, at first we will integrate gateway in TEST mode after succesfully 2-3 transaction on test mode then switch on PROD mode (Production mode paytm crediantials are different then testing mode that provide by Paytm Team after successfully on testing mode.) PAYTM_MERCHANT_MID is also provide by the paytm team via email.. PAYTM_MERCHANT_KEY is also provide by the paytm team via email. PAYTM_MERCHANT_WEBSITE this is also a unique and also provide by the paytm team via email. Set are these criedentials correctly. Step 6: Now open pgRedirect.php file. $ORDER_ID = $_POST["ORDER_ID"]; $CUST_ID = $_POST["CUST_ID"]; $INDUSTRY_TYPE_ID = $_POST["INDUSTRY_TYPE_ID"]; $CHANNEL_ID = $_POST["CHANNEL_ID"]; $TXN_AMOUNT = $_POST["TXN_AMOUNT"]; // Create an array having all required parameters for creating checksum. $paramList["MID"]
Continue Reading

How to Recover Signed APK Key Store Password in Android Studio

By Harsh Aggrawal

How to Recover Signed APK Key Store Password in Android Studio Believe me, it is frustrating to face the problem when you forget the Key Store Password in Android Studio. For most of the time we search on Internet for an actual solution. But getting right answer is not an easy task. Most websites just upload only one method to solve an error but that one method is not enough to work. And again we are back to google and search it again for a correct solution. Most of the developers are faced the problem to get forgot Key Store Password in Android Studio. Do not worry if you are suffering from this problem, this article will provide you to provide solution how to recover Signed APK Key Store password. Trick 1: Step 1: Open folder/ directory where your all Android project are stored or project folder. Like \AndroidStudioProjects. Step 2: Now Open your project named folder for eg. my project folder name is cryptoapp. Step 3: Now, List showing as below... Step 4: Now Open .../app/ Folder and find the .jks file. As showing in image below.
Continue Reading

How to Integrate CCAvenue Payment Gateway in PHP

By Deepak Sharma

How to Integrate CCAvenue Payment Gateway in PHP       Hello Friends today I am talking about how we can integrate CCAvenue Payment Gateway in website, in simply and easy way.   Believe me,  most of the time we are facing problem during integration of any type of payment gate way, but it is not much hard as we think. Today I shall tell you to integrate CCAvenue payment gateway.   These are the following steps:   Step 1: First of all we need a php integration kit of CCAvenue we will provided by CCAvenue or from the merchant panel.   Step 2: Now extract the .zip in to your localhost root folder(www or htdocs).   Step 3: Now we found 4 files, adler32.php, Aes.php, Checkout.php, redirecturl.php.   Step 4: alder.php and Aes.php we donot modify these two files. we need to work on Checkout.php and redirecturl.php.   Step 5: Now open checkout.php. I this file first of all mention merchant_id and working key that are provides by the CCAvenue or From the merchant panel of CCAvenue.   Step 6: Rest are Post Parameter or variable as show bellow..   $amount=$_POST['Amount'];   // Here you can mention your amount or Product / Service.   $order_id=$_POST['Order_Id'];  //Here is your unique order Id generated by your system.   $url='./redirecturl.php';//$_POST['Redirect_Url']; //your redirect URL where your customer will be redirected after authorization from CCAvenue.   $billing_cust_name=$_POST['billing_cust_name']; //Here you can mention the name of customer   $billing_cust_address=$_POST['billing_cust_address'];//Here you can mention the address of customer.   $billing_cust_country=$_POST['billing_cust_country']; //Here customer country.   $billing_cust_state=$_POST['billing_cust_state'];//Customer state.   $billing_city=$_POST['billing_city']; // Customer City.   $billing_zip=$_POST['billing_zip']; // Customer Zip/Pincode .   $billing_cust_tel=$_POST['billing_cust_tel'];// Customer Mobile number.   $billing_cust_email=$_POST['billing_cust_email']; // Customer Email ID   //Now you need to mention customer delivery details. Most of the time delivery details are the same as customer billing details. So Write is same as Billing details.   $delivery_cust_name=$_POST['delivery_cust_name']; $delivery_cust_address=$_POST['delivery_cust_address']; $delivery_cust_country=$_POST['delivery_cust_country']; $delivery_cust_state=$_POST['delivery_cust_state']; $delivery_city=$_POST['delivery_city']; $delivery_zip=$_POST['delivery_zip']; $delivery_cust_tel=$_POST['delivery_cust_tel']; $delivery_cust_notes=$_POST['delivery_cust_notes'];   Step 7 : Now Come to redirecturl.php and pen it.   Step 8 : As I mention $url='./redirecturl.php'; in (Step 6)
Continue Reading

Complete solution to resolve Play Store error 920

By Harsh Aggrawal

Complete solution to resolve Play Store error 920 Believe me,  it is frustrating to face this error until you find a solution of Error 920. For most of the time we search on Internet for an actual solution. But getting right answer is not an easy work. Most websites just upload only one method to solve an error. And generally that one method is not enough to work. And again we are back to google and search it again for a correct solution. Most of the people face error 920 on play store. Don not worry if you are suffering from this error,  this article will provide you four different methods to solve this error 920 problem. Most of the time error 920 on play store come due to following reason some times too much load on your data connection, the connection is getting hampered due to overload,  cache is not cleaned properly, network connection is not stable. METHOD 1: Clearing the cache and data of Google Play Store and Google play service Just go to settings and clear the cache and clear the data of the play store. This will solve the error code 920 the next time you download or update any application from the Google Play store. Following are the steps: Step 1 – Go to settings of your device. Step 2 – Now find “Applications”. Here you can find “Google Play Store” option. Open it. Step 3 – Now, at the bottom, you can find “Clear Cache” option. Press it and clear your all cache. METHOD 2: Re-installing the application Step 1 - Go to the application that you got the error with. Step 2 - Open that application download page on the Play store. Step 3 - Uninstall it or even uninstall all the
Continue Reading

Tutorial - 5 Session Data CodeIgniter PHP Framework

By Harsh Aggrawal

Tutorial - 5 | Session Data | CodeIgniter PHP Framework Hi guys this tutorial based on PHP Framework. Today in this tutorial we discuss on how to set and get Session  in CI. We have already set project in previous tutorial. Lets start... Go to application ->Home // open home controller. First of all load session library in constructor.         function __construct() { parent::__construct(); $this->load->model('HomeModel'); $this->load->library('session'); } Create method.. public function setsession(){         $newdata = array(         'username'  => 'Amit Chanchlani',         'email'     => 'AmitChanchlani@amit.com',         'logged_in' => TRUE ); $this->session->set_userdata($newdata); echo "Session Variable set succesfully"; } In above method, $newdata is array in which we can store our data variable, 'logged_in'=>TRUE is compulsory using Login program. set_userdata() CI function use to set variable in session. Now write code for get session variable values. create method as below..          public function getsession(){ $sessionData = $this->session->userdata(); echo "<pre>"; print_r($sessionData); die; } Now Click on Get Session Value, browser show some thing like image
Continue Reading

Prashant Soni CKD

By Prashant Soni

Prashant soni CKD  web development training services, Open Source Web Development Services, search engine marketing, Manual Search Engine Submission, Mobile Search Engine Marketing, Website Designing, software applications, Software Development Service, education & training, Website Development Services, Dynamic Web Designing services
Continue Reading

Awesome font icons

By Devesh Upadhyay

Icon Description fa fa-align-center fa fa-align-justify fa fa-align-left fa fa-align-right fa fa-bold fa fa-chain fa fa-chain-broken fa fa-clipboard fa fa-columns fa fa-copy fa fa-cut fa fa-dedent fa fa-eraser fa fa-file fa fa-file-o fa fa-file-text fa fa-file-text-o fa fa-files-o fa fa-floppy-o fa fa-font fa fa-header fa fa-indent fa fa-italic fa fa-link fa fa-list fa fa-list-alt fa fa-list-ol fa fa-list-ul fa fa-outdent fa fa-paperclip fa fa-paragraph fa fa-paste fa fa-repeat fa fa-rotate-left fa fa-rotate-right fa fa-save fa fa-scissors fa fa-strikethrough fa fa-subscript fa fa-superscript fa fa-table fa fa-text-height fa fa-text-width fa fa-th fa fa-th-large fa fa-th-list fa fa-underline fa fa-undo fa fa-unlink
Continue Reading

Tutorial - 4 | CodeIgniter PHP Framework

By Harsh Aggrawal

Hi guys this tutorial based on PHP Framework. Today in this tutorial we discuss on how to execute insert and update queries using model in CI. We already created model - views -controller Now follow the step : Firstly we execute insert query in CI Open home view and create form in html <html> <head> <title>Insert in CI </title> </head> <body> <form action="<?php echo base_url(); ?>Home/add" method="post"> <h1>Enter student detail</h1> <div>Student Name</div> <input type="text" name="name"> <br>   <div>Student Email Id</div> <input type="text" name="email"> <br/> <input type="submit" value="submit"> </form> </body> </html> Now save this file in application->views->insert.php with .php extension. Now Open Home controller and create new method named insert(); and load insert view in it.   public function insert() { $this->load->view('insert', $data); } Now open browser and type http://localhost/CI/Home/insert in url. (if you getting error some thing like below : ) Now goto application->config open config.php And replace  $config['base_url'] = ''; with this   $config['base_url'] = 'http://localhost/CI/'; then save it. Now open autoload.php from config directory. replace  $autoload['helper'] = array(''); with $autoload['helper'] = array('url'); this. Now refresh browser and look something like :  Now open Controller Create another method named add();          public function add() { $data = $this->input->post(); $result = $this->HomeModel->add($data); if($result){ redirect(base_url().'Home/index?alert=success'); }else{ redirect(base_url().'Home/index?alert=failed_to_inserted'); } } Now Open Homemodel.php from models directory. Create method add();           public function add($data){    $arr = array(
Continue Reading

Bootstrap Icons

By Ankur Rajput

glyphicon glyphicon-adjust &#xe063; glyphicon glyphicon-alert &#xe209; glyphicon glyphicon-align-left &#xe052; glyphicon glyphicon-align-center &#xe053; glyphicon glyphicon-align-right &#xe054; glyphicon glyphicon-align-justify &#xe055; glyphicon glyphicon-apple &#xf8ff; glyphicon glyphicon-arrow-left &#xe091; glyphicon glyphicon-arrow-right &#xe092; glyphicon glyphicon-arrow-up &#xe093; glyphicon glyphicon-arrow-down &#xe094; glyphicon glyphicon-asterisk &#x2a; glyphicon glyphicon-baby-formula &#xe216; glyphicon glyphicon-backward &#xe071; glyphicon glyphicon-ban-circle &#xe090; glyphicon glyphicon-barcode &#xe040; glyphicon glyphicon-bed &#xe219; glyphicon glyphicon-bell &#xe123; glyphicon glyphicon-bishop &#xe214; glyphicon glyphicon-bitcoin &#xe227; glyphicon glyphicon-blackboard &#xe218; glyphicon glyphicon-bold &#xe048; glyphicon glyphicon-book &#xe043; glyphicon glyphicon-bookmark &#xe044; glyphicon glyphicon-briefcase &#xe139; glyphicon glyphicon-bullhorn &#xe122; glyphicon glyphicon-calendar &#xe109; glyphicon glyphicon-camera &#xe046; glyphicon glyphicon-cd &#xe201; glyphicon glyphicon-certificate &#xe124; glyphicon glyphicon-check &#xe067; glyphicon glyphicon-chevron-down &#xe114; glyphicon glyphicon-chevron-left &#xe079; glyphicon glyphicon-chevron-right &#xe080; glyphicon glyphicon-chevron-up &#xe113; glyphicon glyphicon-circle-arrow-down &#xe134; glyphicon glyphicon-circle-arrow-left &#xe132; glyphicon glyphicon-circle-arrow-right &#xe131; glyphicon glyphicon-circle-arrow-up &#xe133; glyphicon
Continue Reading

Skype obtaining call recording feature on Android and different platforms

By Ankit Gupta

Skype has been on the reply for a long time currently. There are much Better alternative on most platforms, like Google Hangouts and Discord. As per with a report from The Verge, Skype can shortly be obtaining a Call recording feature on Android in conjunction with alternative platforms. It’s a cloud-based feature, therefore you can do it pretty much about anyplace that you  can use Skype. It combines all screens shared within the Call, in conjunction with webcams and, of course, audio. While technically Skype supported Call recording 15 years ago, this is often its initial true introduction. Users trying to record their Skype calls had to appear towards alternatives.  On Android, that proved somewhat of a difficult task years ago when screen recording required root. Currently it’s  easier, however Built-in support for it's even higher. For privacy reasons, all users within the Call are notified if a user is recording. This new Call recording feature comes as a part of the fresh Skype 8.0 update, that was discharged nowadays. It Features a mobile-like style on desktops and supports Twitter-esque mentions and full end-to-end coding. 1080p video calling support has also been added, and a video call will have up to 24 individuals in it at just one occasion. There’s currently a chat media gallery too, where you'll be able to see all of your shared photos in an exceedingly speech. While Skype is clearly attempting to gain a foothold into the market, is it too little , too late? Alternatives have had an extended time to require off and Microsoft has solely began to listen to it’s VoIP service within the last 2 years or so. With the addition of Skype business executive too, it’s clear that the service is not any longer on the backburner. We’ll have to see how it fares in the coming months and whether or not or not the service will build a real comeback.
Continue Reading

How to work with Google Assistant on your iPhone and android smartphone

By Ankit Gupta

Google unraped its virtual assistant back in 2016. known as Google Assistant, it rivals similar services from Apple, Microsoft and Amazon; known as Siri, Cortana and Alexa severally. Over the years, the search giant has created Google more personalized, creating it associate ready personal assistant for many users. The Google's assistant isn't solely accessible on Android and iOS device however additionally on IoT devices like smart TVs, refrigerators, smart speakers etc. Other than search, Google Assistant currently helps users in tasks admire turning the lights on/off, switch on/off Wi-Fi and additional simply by voice commands. So if you're questioning a way to get going with Google Assistant on your smartphone, here’s a whole ready-to-use guide for you: How to Download and install Google Assistant Most of the robot smartphones nowadays escort Google Assistant pre-installed and if it’s not there, you'll be able to merely Download it from Google Play Store. Apple iPhone/iPad users need to download it from the App Store. How to setup Google Assistant Setting up Google Assistant is a straightforward affair, merely follow the steps below supported the device you're using: For Android Users: 1. Press and hold the home button to activate Google Assistant. 2. tap on Agree to settle for the terms and conditions. 3. Now activate the voice command, tap on Continue and switch on the Ok Google toggle on consecutive screen. 4. Once done, Google Assistant is all able to answer your queries and do heaps additional. For iPhone/iPad users: 1. Open Google Assistant app. 2. Follow instructions in the app 3. Turn on the Ok Google detection option. 4. The app will ask you to say 'Ok Google' and 'Hey Google' commands four times. 5. Once you are done with the above steps, you can now use 'OK Google' command to activate Google Assistant. How to setup voice matching: Turning on the voice matching feature will let you avoid the accidentally activating the app. With this feature, Google can recognize your voice and trigger the app. To setup, the voice matching feature follow the steps below: 1. Head to the Google app and tap on the 3 horizontal bars
Continue Reading

CodeIgniter PHP Framework Tutorial - 3

By Harsh Aggrawal

Hi guys this tutorial based on PHP Framework. Today in this tutorial we discuss on how to execute mysql queries using model in CI. First of all we know the base knowledge of MYSQL queries. Now we create model, as we discussed earlier How to create model and which directory of CI contains model file. Following are the steps:- Open application->model , now  Open your text editor Notepad++ or else create now file and write following code : - class HomeModel extends CI_Model { public function __construct() { parent::__construct(); $this->load->database(); } public function index()  {         } } As we already discuss each line of above code in previous tutorial. Now we need to work on index() action/method, first of all we get the data from table of database. I thing you have already known about database and table formation. For ex - we have a Table named Student, and its fields are as follow.. CREATE TABLE table_name( id int auto increment, name varchar(255), email_id varchar(255), PRIMARY KEY( id ) ); Now create a query in CI..                         $this->db->select('*'); $this->db->from('student'); $this->db->order_by('name', 'asc'); $query = $this->db->get();                        if($query->num_rows()>0) {        return $query->result_array();                         } The above query help to fetch whole data from student table. All data return to controller, and code looks like.... class Home extends CI_Controller {   function __construct() { parent::__construct(); $this->load->model('HomeModel');   } public function index() { $data['students_list'] = $this->HomeModel->getStudentsList(); } } $data['students_list'] assign a variable in which store data get from model. Now display this data on web page... firstly we create view file... in view directory. <html> <table border="1"> <thead> <tr> <td>Id</td> <td>Name<
Continue Reading

Google Pixel smartwatches are expected to come by the end of this year.

By suryansh gautam

The google watches are expected to be power-driven by Qualcomm Snapdragon Wear 3100 platform. Google's robot smartwatches did not do nearly as good as Apple watches did within the market currently. Not like Apple, Google never extended its own wearables but integrated its software package in watches from different brands such as LG, Fossil cluster and Movado. However, we may get to see Google's own smartwatches coming back this year. According to a tweet by communicator Evan Blass, Google is organizing its wearable which can be sold-out beneath the pixel brand. The smartwatch can come back along with the combination of smartphones pixel 3, pixel 3 XL and pixel Buds. The precise amount of its launch has not been specified however it's going to precede the tip of this year.  Google is organizing its wearable which will be sold under the Pixel brand. This May, WinFuture(online web-based portal) free a report concerning code-names of 3 models of element watches together with a brief on their hardware. Code-named as Ling, Triton and Sardine, the wearables are expected to be in their final stages of development. The watches are expected to be hopped-up by Qualcomm Snapdragon 3100 platform whereas the presently offered ones utilize Qualcomm Snapdragon 2100 processor. On the feature front, Google Element smartwatches can support GPS and heart-rate tracker for the fitness aware users. They may additionally come back equipped with voice command options that, going by this trend, is obvious. The forthcoming Snapdragon 3100 platform is claimed to come back equipped with higher battery consumption capabilities. Google presently offers smartwatches through its Wear OS platform where you'll be able to notice a range of watches that work on Android also an iPhone. The future accessories will also work with both the operative systems while providing advanced options and will provide a competition to Apple's smartwatches that are gaining smart range since their introduction.
Continue Reading

Tutorial - 2 CodeIgniter PHP Framework

By Ankur Rajput

Hi guys, This tutorial based on PHP framework (CodeIgniter), Today we learn how to create controllers models and views. 1.  How to create controller. Then follow these steps...   Goto application -> controllers dir. This directory contains all controllers of your projects. Lets create Home.php file in your notepad++ or else then save it in controller diretory. Make sure the your first letter of your file name is capital for ex- Home.php.  Now create class using following source code...   class Home extends CI_Controller   { function __construct() { parent::__construct(); } public function index() { } ?> In the above code Home is a class name which extent CI_Controller class. function __construct() is the constructor in which code can write need to run first. public function index() this is public function and name index(), by default controller called index function/action. Write you php code that you want to perform for ex-  public function index() {        echo "this is my first controller"; }   2. Now, we create model in which you can write your mysql quires.  Goto application -> model directory. In this location you can store your all model file for ex... Now create first model. As earlier we discuss model file also in .php file, Now, open your notepad++ or else editor then type the follow code...  if (!defined('BASEPATH')) exit('No direct script access allowed'); class HomeModel extends CI_Model { public function __construct() { parent::__construct(); $this->load->database(); } public function index() {              $this->db->select('*');      $this->db->from('customer');              $query = $this->db->get();              return $query->result();         } }  if (!defined('BASEPATH')) exit('No direct script access allowed'); this line protect your file to avoid direct access. class HomeModel extends CI_Model as we discussed on class name First letter should be in capital which extents CI_Model class.
Continue Reading

What is Laravel and how to install at localhost?

By Harsh Aggrawal

What is Laravel and how to install at localhost? Laravel is the PHP  web framework, created by Taylor Otwell. Laravel is open source which freely available for anyone. Laravel - intended for the development of web applications following the model–view–controller (MVC) architectural pattern and based on Symfony. Following are steps, to install / setup laravel on your localhost(Wamp/Xampp server). First of all download COMPOSER (Composer is an application-level package manager for the PHP programming language that provides a standard format for managing dependencies of PHP software and required libraries). Composer help developer for creating controllers and views and so many dependencies which required by MVC. Install compose from the give link https://getcomposer.org/download/ , then goto manual download https://getcomposer.org/Composer-Setup.exe for first time user and windows OS user. Create your first directory using composer command in CMD. First type composer to check it is install properly or not.it seems like that. Then set directory path of www or htdocs in wamp or xampp simultaneously.\ Then type composer command composer create-project --prefer-dist laravel/laravel blog. Now your first project on laravel is created successully. Now you can run by two methods... Using composer command php artisan serve . Second open localhost > lab > public. End. Next Blog on how to create controller and model using composer and create view. We can also learn about file structure of Laravel. Thank You for reading....
Continue Reading

Tutorial - 1 | CodeIgniter PHP Framework

By Harsh Aggrawal

CodeIgniter is best framework my point of view for web development for beginners in PHP. Let us know about best part of CodeIgnitor i.e it is open source as well as smaller in size, easier to download and setup your project in it. Some basic feature of CodeIgniter are as follow- 1. CodeIgniter based on Model-View-Controller Based System. 2. Extremely Light Weight as I told you smaller in size. According to (https://codeigniter.com) CodeIgniter-3 has a 2MB download, including the user guide. 3. It have full Featured database classes with support for several platforms like MySql, MS SQL, Oracle etc. 4. Query Builder Database Support. 5. Form and Data Validation 6. Session Management and so many features are available. View complete list visit CodeIgniter Features Best part according to me i.e we can create separate modules in separate folder location called Modules (we will discussed later about this.) and for beginners can make core query I thing which is easy for beginners write own query rather than using pre made functions. Firstly you can download CodeIgniter from its own site https://codeigniter.com. Currently Version 3.1.9 is stable released on 2018.06.12 Then follow these steps...   Extract this folder in your root folder (www/htdocs). Then rename folder with your project name. Then open this folder, there are 2 main folder named like application,system and 1 php file named index.php, about index.php will discuses later. Then application which contains controllers,models,views,config,helper,library,logs,languages and cache these folder are useful for our project. Mainly we focused on 3 folder at beginning (controllers,models and views). Folder -controllers contain all your controllers basically controller is php file in which you can write all your php computation and manipulation script are writing. Folder -models contain all your models basically models is php file in which you can write mysql queires. Folder -views cantain all your views basically your html pages stored in this folder. Folder -config contains autoload,config,constants,database,doctypes,foreign_char,hooks,memcached,migration,mimes,profilers,routes,smileys,user_agents, but at beginning we need to concentrate on config, autoload,database and routes. File -config.php
Continue Reading